NotebookLM Audio Overview
Blue bubble – green bubble, iMessage or just the Apple ecosystem itself. Those are usually the top reasons people say it’s hard to leave an iPhone once they are locked in. While those are certainly true, the one app that makes switching to Android a non-starter for me is Polycam. I’ve thought about switching plenty of times (that’s a whole other conversation), but this app has completely changed my workflow and saved me countless hours on sites. I can scan a space in minutes – no notebook, camera or tape measure needed – and leave the site with everything I need right on my phone. In this post, I’ll show you what Polycam does, the features you get at different pricing levels and some tips i’ve picked up along the way for getting consistently clean, accurate scans.
Why do I use it?
Polycam is my go to for most site scans that we need to complete in a timely manner. It’s ease of use, low cost, on device processing and fantastic outputs makes for a combination that I have yet to find another competitor come close.
Whether I am scanning an existing space to get a measurement layout for estimating or trouble shooting issues on site with crews, Polycam has become an invaluable tool in our day to day operations.
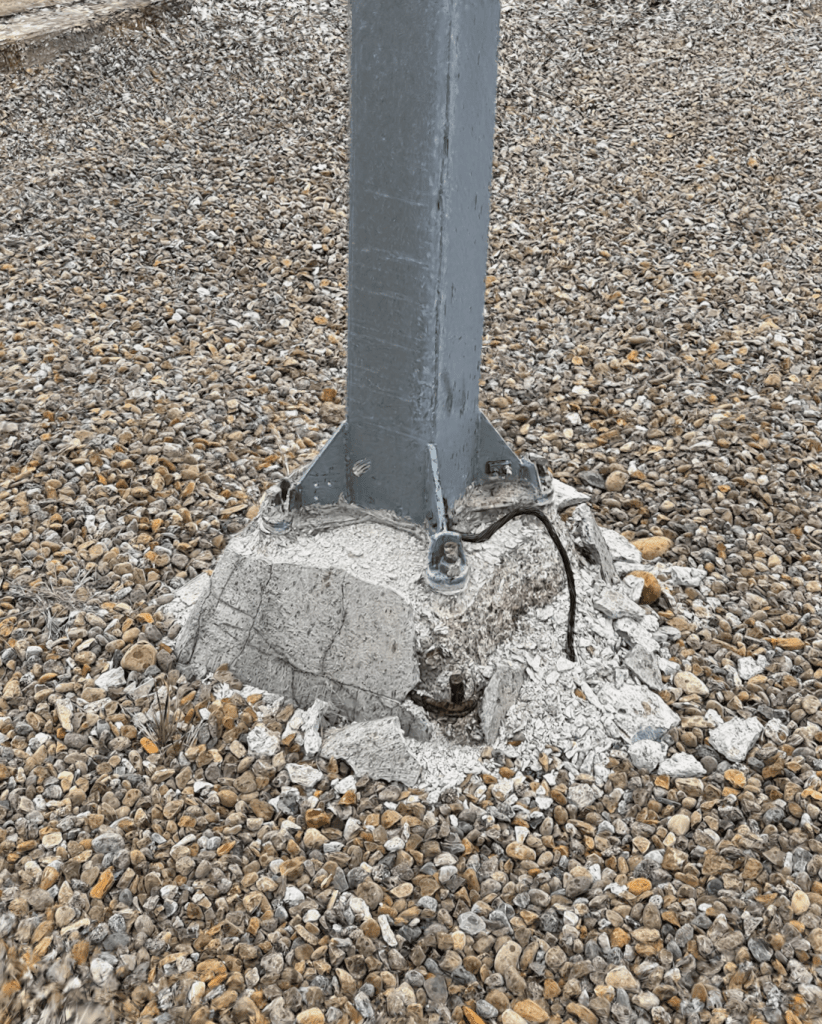
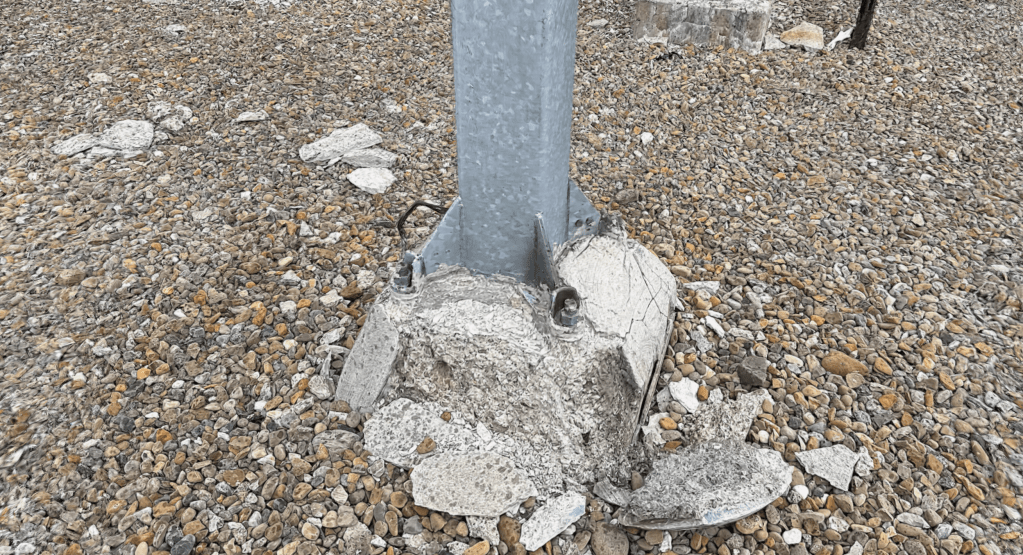
This image is from a site where we were repairing deteriorating concrete bases (view the model here). This 3D scan allowed our field crews to easily provide up to date site conditions to managers in the office as well as engineers on the project. These scans have saved countless site visits and thousands of dollars by getting an accurate, detailed 3D model of what the field crew is seeing.
What can Polycam do for you?
For what you pay, Polycam has a surprisingly robust feature set that can work into a number of daily workflows. They recently had a large update to their apps and web portal as part of their Vision 25 Announcement with new features being added. You are now able to create the following in the app:
- Lidar – Allows you to free scan your environment with the LiDAR scanner
- Floorplan – Use AR guidance to create fast and precise 3D and 2D floorplans
- Object – Create a highly detailed photogammetry mesh or Gaussian Splat model
- Space – Generate an accurately scaled instant floorplan and LiDAR mesh
- 360 – Capture a 360 image
- Upload Photos – Upload images to create a model or splat
- Create a new Scene (Business Plan Only) – Build a 3D scene with your captures
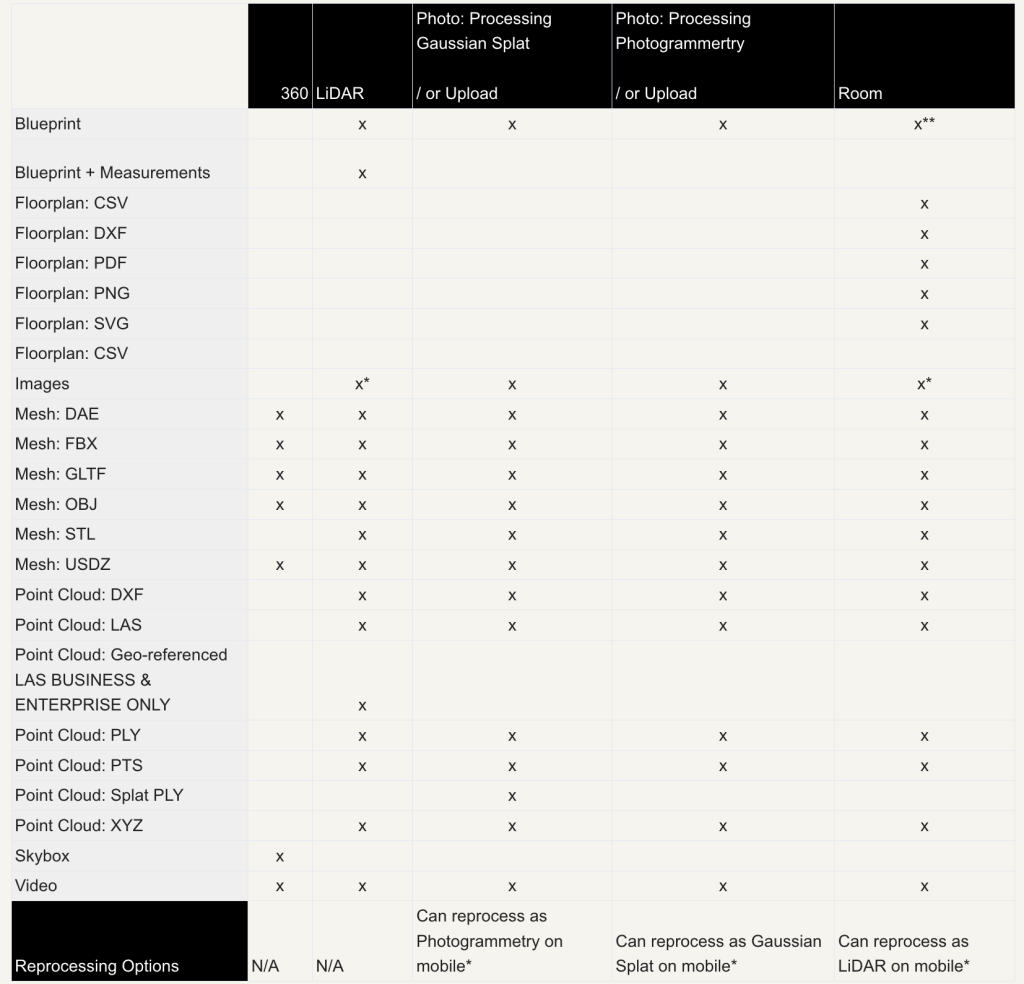
Below are the outputs that can be exported by each mode:
Polycam is a fantastic app with a ton of features with the one caveat being, to fully realize all of the features, an iPhone Pro (12 or later) or iPad Pro (2020 or later) is required as they have the LiDAR scanners that allow for the main features. And this is the main reason why I won’t be switching anytime soon as none of this is possible on the Android counterparts. So while that can be a sizeable purchase for alot of people (and they don’t seem to be going down in price) it is still an inexpensive alternate to enterprise solutions that offer the same features. Polycam has a great Help Center that provides more information on exporting & workflows, help articles and additional in depth information available here.
Ok, what’s it going to cost me?
The main question everyone asks, and usually the deciding factor whether an app is used or not is the associated cost. Polycam offers 4 tiers – Free, Pro, Business and Enterprise. Below is a breakdown of the costs and the main differences between the tiers.
Free!
– 20 object captures, unlimited spatial captures
– Capture objects with 100 images per capture
– Export 3D captures in GLTF
– Web link sharing
– Seamless cross-platform access (Web, iOS, Android)
Pro – $27/month, $17/month Billed Annually (Includes 7 day free trial)
Everything in Free, plus
– Unlimited object mode captures
– Capture XL objects and spaces (1-2K images per capture)
– 12+ industry standard export formats
– Private sharing
– 2D floor plans & measurements
Business – $34/Seat/Month *Annual Commitment Only (Includes 7 day free trial)
Everything in Pro, plus
– Up to 15 members
– Team library & auto-upload
– Advanced floor plans and point cloud features
– Centralized billing & admin tools
– Album sharing & saved measurements
Enterprise – Contact Sales
Everything in Business, plus
– Dedicated team onboarding to custom team workspaces
– Enhanced security & access controls
– Single Sign-On (SSO)
– API integrations (coming soon)
– SOC-II & GDPR compliance (coming soon)
In my opinion, the pricing tiers for what you get are extremely fair. The Free mode allows users to cover most of the basics and depending on the use cases, may be enough for some people. The Pro mode (current tier that I use) is extremely robust and I have never hit any limitations in my use. For a full comparison of the tiers, you can visit Polycam’s site here.
So what’s the big deal?
For me, Polycam has improved a number of tasks in my day to day workflow and has become an invaluable part of my tool kit. Like any product, it has its strengths and weaknesses and for me the positives far outweigh the negatives. The main use cases that I currently use it for are measuring sites for estimating, problem solving with crews on site, providing project updates to clients and consultants, assisting with as-built documentation and providing basic drone photogammetry models for site overviews.
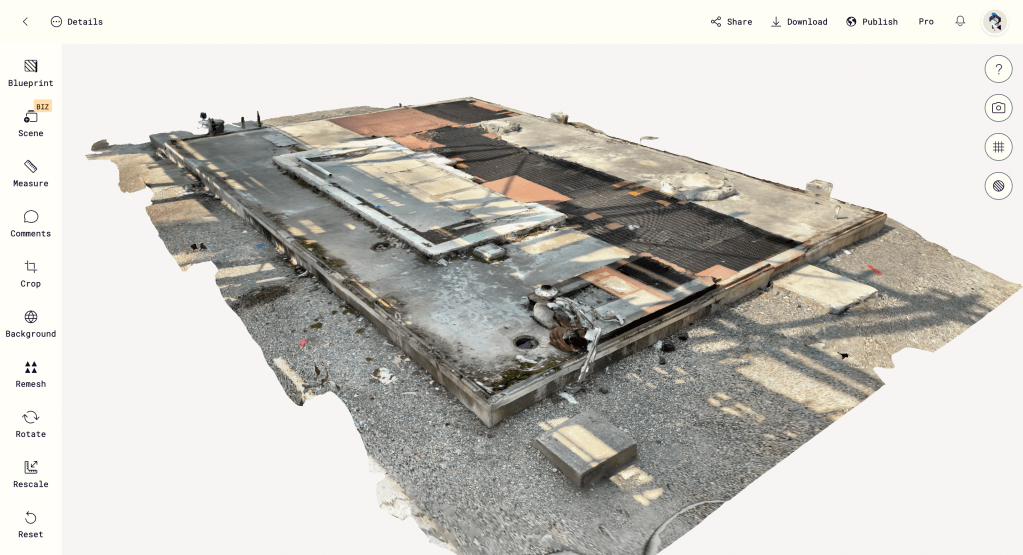

The images above show the main model screen and the measurement screen on the web portal. If the model was captured with either the iPhone or iPad models mentioned earlier in the post, the LiDAR on the device was used which provides an accurate, scaled capture. If the model is created from uploaded photos it will need to be scaled manually to ensure any measurements are accurate. Like anything, ensure there have been a few manual measurements taken from site to double check against the measurements in the model.
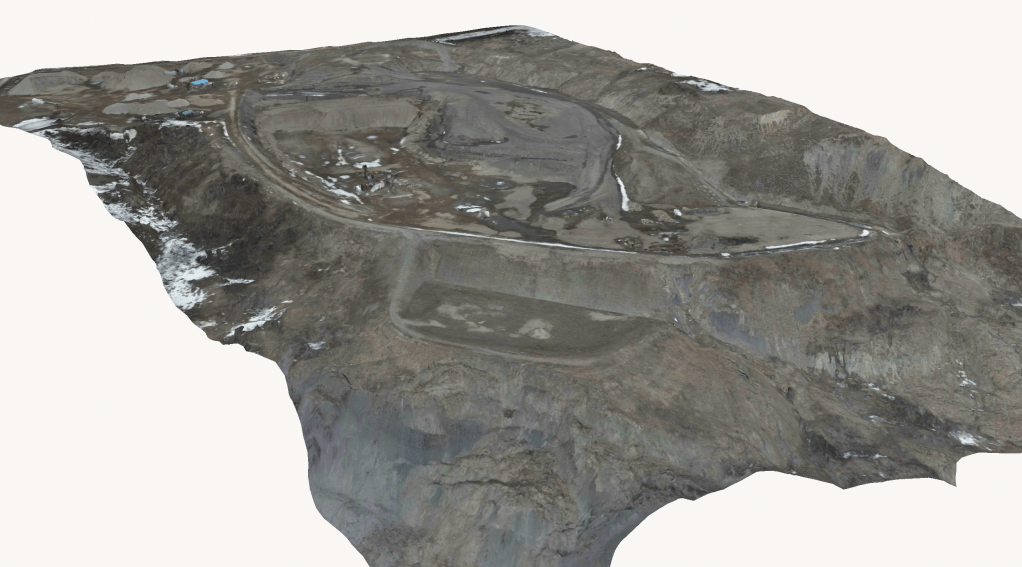
Drone photogammetry would be one area where I will use it to create quick, shareable site overviews with clients but isn’t it strongest point. it doesn’t create near as detailed meshes as dedicated photogammetry software and the point clouds that it exports are not very dense, but again, for the price you are paying the results are more than I would expect.
One of its strong points, and a feature I love to use, are the Gaussian splats. As you can see from the image above it creates an extremely detailed, photorealistic 3D model of an object. If these models are captured with the LiDAR equipped iPhone and iPad they will also be to scale and measurements can be taken from them on both the device that captured them and the web portal once they are uploaded.
Tips and tricks I have picked up along the way
Ensuring some simple steps are followed can reduce a lot of frustrations and ensure that scans are completed as accurate as possible the first time. While it does a good job of scanning areas without much knowledge of the app, following a few of these steps can ensure they turn out great.
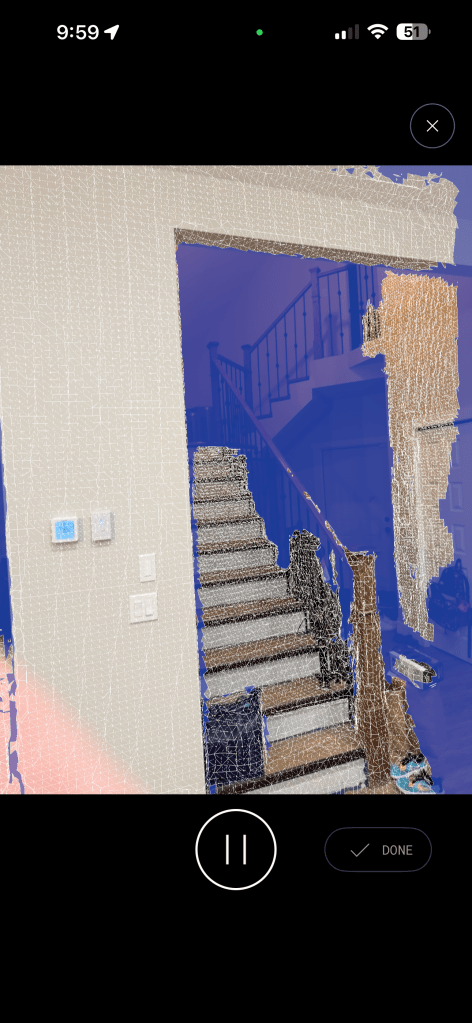
Ensure the blue areas are filled – When the app is first opened and a scan is started, it will take a second and a grid will show on the screen (mesh preview) where the LiDAR scanner can reach. Once you start recording the scan, move your device up and down, from the floor to the ceiling, as you move around the space (think of it like painting a wall with a roller).
Try not to overlap, plan for succes – As you are working your way around a space, try not to re-scan over areas that have already been completed. This tends to lead to the new information not matching perfectly with what was previously scanned and can cause issues with the final product. For larger scans, I will usually plan out how I want to scan each room. You can also create multiple scans in a large area and combine them later.
Move slowly – While scanning, ensure you are moving at a slow, consistent pace. Moving to fast can cause drift leading to distortion in the model. The app will tell you if you are moving to fast and have a warning to slow down.
After a few scans you will get an idea of what works and what doesn’t. Practice makes perfect and the more scans you complete the more comfortable you will become and the results will continue to improve. Always make sure you process the results to ensure they are satisfactory before you leave site. Nothing worse than leaving a site thinking you have everything only to learn later that there was an issue with one of the captures and it’s not useable.

While this is just my experience with Polycam, I hope I’ve shared some useful and relatable insight into how it can be used in real-world construction workflows. Like I’ve said throughout this post, I genuinely can’t overstate how much time this app saves me. From ditching the tape measure and notebook at site meetings to improving communication between the field and the office, Polycam has become the main reason I stick with the Apple ecosystem.
I’m grateful for the chance to share what I’ve learned, and I hope something in here helps you save time—or at least makes your day a bit easier.
This is exactly why I started The Intelligent Jobsite. To highlight tools that help us work smarter, communicate better, and reduce a bit of the everyday chaos. Polycam is a great example of that, and I’d love to hear how you’re using it in your own workflows.
Until next time, have a great week everyone
Hank
